티스토리 뷰
데이터 로거(data logger)
SD Card
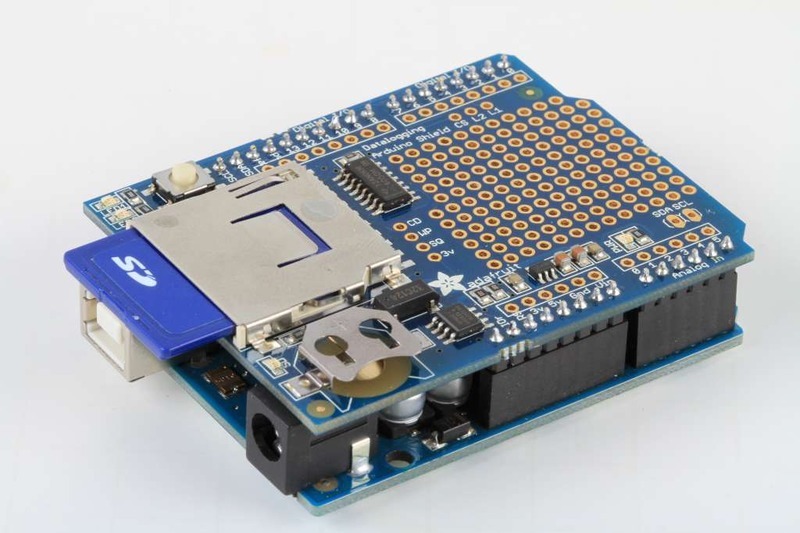
The other half of the data logger shield is the SD card. The SD card is how we store long term data. While the Arduino chip has a permanent EEPROM storage, its only a couple hundred bytes - tiny compared to a 2 gig SD card. SD cards are so cheap and easy to get, its an obvious choice for long term storage so we use them for the shield.
The shield kit doesn't come with an SD card but we carry one in the shop that is guaranteed to work. Pretty much any SD card should work but be aware that some cheap cards are 'fakes' and can cause headaches.

You'll also need a way to read and write from the SD card. Sometimes you can use your camera and MP3 player - when its plugged in you will be able to see it as a disk. Or you may need an SD card reader. The shield doesnt have the ability to display the SD card as a 'hard disk' like some MP3 players or games, the Arduino does not have the hardware for that, so you will need an external reader!

Formatting under Windows/Mac
If you bought an SD card, chances are it's already pre-formatted with a FAT filesystem. However you may have problems with how the factory formats the card, or if it's an old card it needs to be reformatted. The Arduino SD library we use supports both FAT16 and FAT32 filesystems. If you have a very small SD card, say 8-32 Megabytes you might find it is formatted FAT12 which isnt supported. You'll have to reformat these card. Either way, its always good idea to format the card before using, even if its new! Note that formatting will erase the card so save anything you want first
We strongly recommend you use the official SD card formatter utility - written by the SD association it solves many problems that come with bad formatting!
Download the formatter from https://www.sdcard.org/downloads/formatter_4/
Download it and run it on your computer, there's also a manual linked from that page for use
Next, select the CardInfo example sketch

This sketch will not write any data to the card, just tell you if it managed to recognize it, and some information about it. This can be very useful when trying to figure out whether an SD card is supported. Before trying out a new card, please try out this sketch!
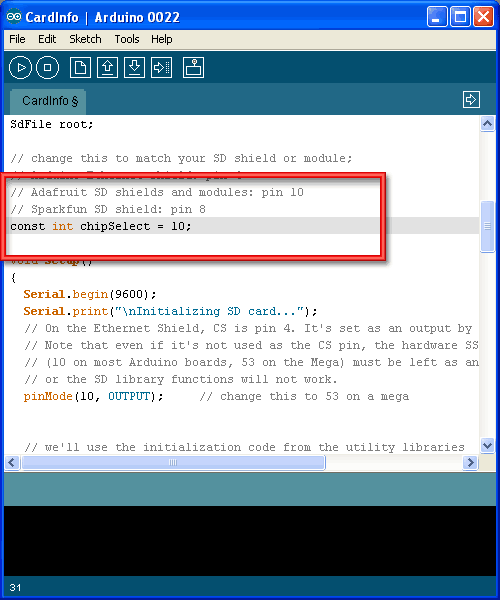
Go to the beginning of the sketch and make sure that the chipSelect line is correct, for the datalogger shield we 're using digital pin 10 so change it to 10!

OK, now insert the SD card into the Arduino and upload the sketch

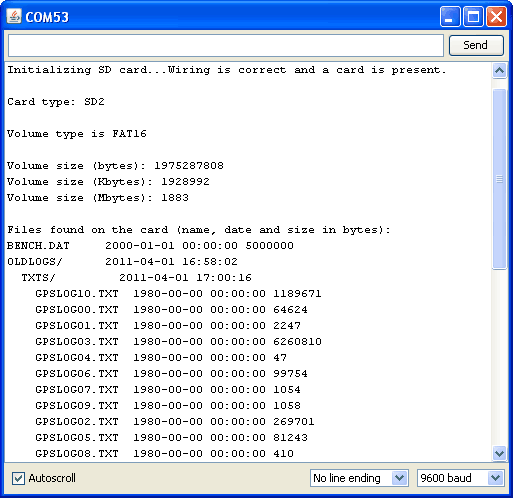
Open up the Serial Monitor and type in a character into the text box (& hit send) when prompted. You'll probably get something like the following:

'HWDesk > ElectronicParts' 카테고리의 다른 글
| Transistor - BJT (0) | 2020.03.08 |
|---|---|
| Electric Circuit Control with Hysteresis (0) | 2020.03.01 |
| Op-Amp를 이용한 삼각파 만들기 (0) | 2020.02.20 |
| Noncontact Voltage Detector 조사 (0) | 2020.02.17 |
| [DataLogger] Light & Temperature Test (0) | 2020.02.17 |
- Total
- Today
- Yesterday
- BSC
- BiliChild
- ServantClock
- Innovation&Hurdles
- 빌리칠드
- 심심풀이
- DYOV
- 허들
- Video
- 혁신과허들
- 전압
- 혁신
- 전류
- 배프
- Innovations
- 심심풀이치매방지기
- 빌리언트
- bilient
- 치매
- image
- Decorator
- arduino
- 둎
- 절연형
- 치매방지
- 오블완
- Innovations&Hurdles
- 아두이노
- Hurdles
- 티스토리챌린지
| 일 | 월 | 화 | 수 | 목 | 금 | 토 |
|---|---|---|---|---|---|---|
| 1 | 2 | 3 | ||||
| 4 | 5 | 6 | 7 | 8 | 9 | 10 |
| 11 | 12 | 13 | 14 | 15 | 16 | 17 |
| 18 | 19 | 20 | 21 | 22 | 23 | 24 |
| 25 | 26 | 27 | 28 | 29 | 30 | 31 |

