

티스토리 뷰
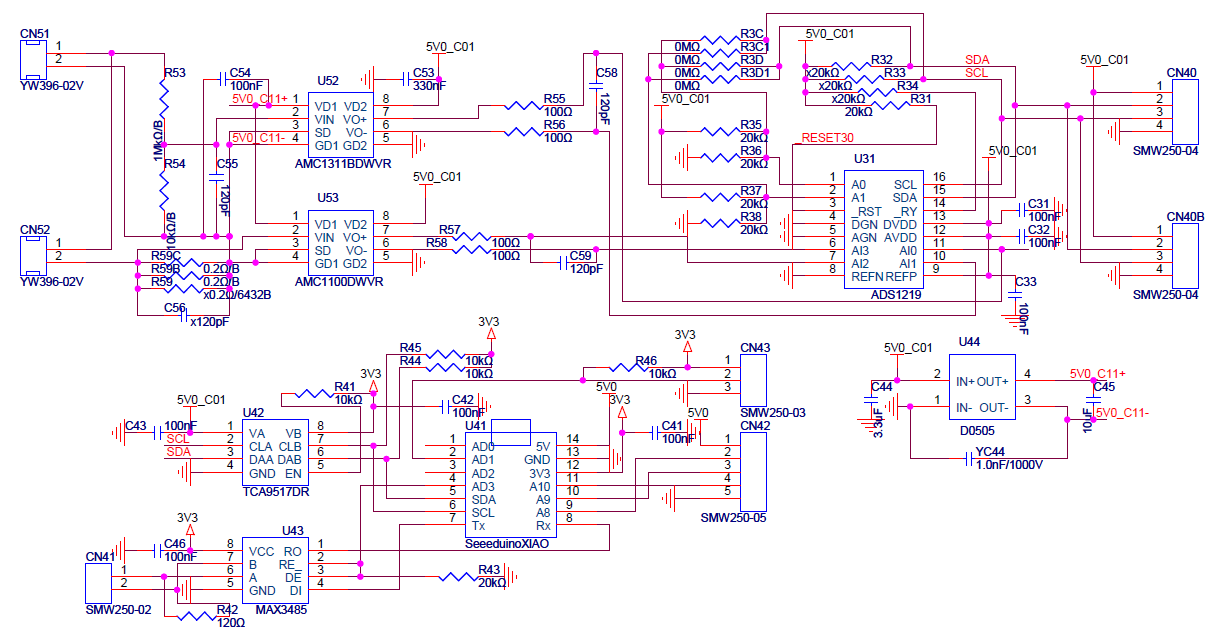
#include <Wire.h>

#define ADDRESS_THISSLAVE 0x24
#define NUMBER_I2CBYTES 2

#define PIN_ChargeON 8
#define PIN_DischargeON 9
#define PIN_PWM 10
#define PIN_INDICATORLED LED_BUILTIN

int PWM_Value = 0;
int PWM_Direction = 1;
char DeviceMode = 'M';
byte ReceivedBytes[NUMBER_I2CBYTES];
boolean IsI2CReceived = false;

unsigned long PreMilisecond = 0;
unsigned long StartTime_IndicatorLED = 0;

void _receiveEvent(int numBytes){
  // 'C', 123
  int i=0;
  String rxString = "";
  IsI2CReceived = false;
  while(Wire.available() && (i<NUMBER_I2CBYTES)){
    ReceivedBytes[i] = Wire.read();
    rxString += String(char(ReceivedBytes[i]));
    i++;
  }
  while(i<numBytes){
    Wire.read();
    i++;
  }
  Serial.println(rxString);
  if(i<NUMBER_I2CBYTES) return;
  IsI2CReceived = true;
  DeviceMode = char(ReceivedBytes[0]);
  int pwmValue = int(ReceivedBytes[1]);
  boolean isChargeON = false;
  boolean isDischargeON = false;
  switch(DeviceMode){
    case 'C': // Charge
      isChargeON = true;
      PWM_Direction = 0;
      break;
    case 'D': // Discharge
      isDischargeON = true;
      PWM_Direction = 0;
      break;
    case 'O': // OFF
      break;
    case 'M': // Monitoring
      PWM_Direction = 1;
      break;
    case 'A': // Ack
      digitalWrite(PIN_INDICATORLED, LOW);
      StartTime_IndicatorLED = millis();
      PWM_Direction = 0;
      break;
    default:
      break;
  }
  digitalWrite(PIN_ChargeON, LOW);
  delay(2);
  digitalWrite(PIN_DischargeON, LOW);
  PWM_Value = pwmValue;
  if(pwmValue>255) pwmValue = 255;
  analogWrite(PIN_PWM, PWM_Value);
  delay(23);
  if(isChargeON) digitalWrite(PIN_ChargeON, HIGH);
  if(isDischargeON) digitalWrite(PIN_DischargeON, HIGH);

  PreMilisecond = 0;
}

void _responseEvent(){ // Send 3 bytes
  Wire.write(ADDRESS_THISSLAVE);
  Wire.write(byte(DeviceMode));
  Wire.write(byte(PWM_Value));
}

void setup() {
  // put your setup code here, to run once:
  Serial.begin(115200);
  Wire.begin(ADDRESS_THISSLAVE);
//  Wire.setClock(100000L);
  Wire.onReceive(_receiveEvent);
  Wire.onRequest(_responseEvent);

  pinMode(PIN_ChargeON, OUTPUT);
  pinMode(PIN_DischargeON, OUTPUT);
  pinMode(PIN_PWM, OUTPUT);
  pinMode(PIN_INDICATORLED, OUTPUT);

  analogWrite(PIN_PWM, 128);
  digitalWrite(PIN_ChargeON, LOW);
  digitalWrite(PIN_DischargeON, LOW);
}

void loop() {
  // put your main code here, to run repeatedly:

  if((millis() - StartTime_IndicatorLED)>500) digitalWrite(PIN_INDICATORLED, HIGH);

  if((millis()-PreMilisecond)<5000) return;
  PreMilisecond = millis();
//  analogWrite(PIN_PWM, PWM_Value);

  PWM_Value = PWM_Value + PWM_Direction*10;

  if(PWM_Direction>0){
    if(PWM_Value>250) PWM_Direction = -1;
  }else if(PWM_Direction<0){
    if(PWM_Value<10) PWM_Direction = 1;
  }
}
반응형
'BilientSevices > Measurement&Monitoring' 카테고리의 다른 글
| 시스템 및 센서별 업로드 데이터 형식/내용 (0) | 2026.08.07 |
|---|---|
| BiliMon 시스템의 데이터에 사용되는 주요 약어 정리 (0) | 2026.08.05 |
| 하드웨어+펌웨어+앱+웹(서버) 통합 개발 - BiliMon (0) | 2026.07.31 |
| BiliMon266, Ver.0.6 (0) | 2026.06.07 |
| BiliMon 시스템을 활용한 우선 추진 비즈니스 모델 (0) | 2026.06.03 |
반응형
250x250
최근에 올라온 글
최근에 달린 댓글
- Total
- Today
- Yesterday
링크
TAG
- DYOV
- 전류
- 심심풀이치매방지기
- 아두이노
- Innovations&Hurdles
- 오블완
- 혁신과허들
- Decorator
- ServantClock
- 둎
- 배프
- 빌리언트
- BiliChild
- 전압
- Innovations
- bilient
- BSC
- 허들
- Innovation&Hurdles
- 빌리칠드
- 치매방지
- 치매
- 티스토리챌린지
- Video
- image
- 심심풀이
- Hurdles
- 절연형
- 혁신
- arduino
| 일 | 월 | 화 | 수 | 목 | 금 | 토 |
|---|---|---|---|---|---|---|
| 1 | 2 | 3 | 4 | 5 | ||
| 6 | 7 | 8 | 9 | 10 | 11 | 12 |
| 13 | 14 | 15 | 16 | 17 | 18 | 19 |
| 20 | 21 | 22 | 23 | 24 | 25 | 26 |
| 27 | 28 | 29 | 30 |
글 보관함